Level Streaming
Contents
Introduction
Ark uses Level Streaming, which makes it possible to load and unload map files into memory as well as toggle their visibility during play. This makes it possible to have worlds broken up into smaller chunks so that only the relevant parts of the world are taking up resources and being rendered at any point. If done properly, this allows for the creation of large maps without causing performance issues.
We will be using World Composition to setup our level streaming. World Composition is a specific form of level streaming that allows you to set up different layers that can be streamed in at different distances. Allowing levels to be streamed in as the player approaches them.
Setting Up Level Streaming
First we need to create a streaming layer inside the World Composition window, to do this, we need to open up the Levels window. In the top left of the dev kit click Window, then select Levels. You should now have the Levels window open.
Now we need to open up the World Composition window. In the Levels window there is a diamond shape with a down arrow above it, clicking this will bring up the World Composition window.
Creating Streaming Layers
Now that we have the World Composition window open we need to create some layers.
In the World Composition window, click the + button near the top left. This will open up the New Streaming Layer popup. Give your layer a name, this can be anything. Then set the streaming distance that you want levels assigned to this layer to have. And click Create.
Some common streaming distances:
- 20000 - The Island uses this distance for its near sublevels.
- 50000 - The Island uses this distance for its far sublevels.
- 1 - The Island uses this distance for caves and the boss arenas.
Assigning Levels To Streaming Layers
Now that we have our layers created, we need to assign our levels to a layer in order to get streaming to work. This is fairly simple to do. In the levels window, right click a level, hover over Assign to Layer, then choose which layer you want to assign the level to.
Setting up Level Streaming For Caves
First we need to create a streaming layer with a distance of one, this makes it so every level assigned to the layer wont load in until the player is right on top of it. Now assign your cave sublevel to this new layer. We are going to be using a Tile Streaming Volume to control when our cave is loaded in, as well as what other levels are loaded in with our cave.
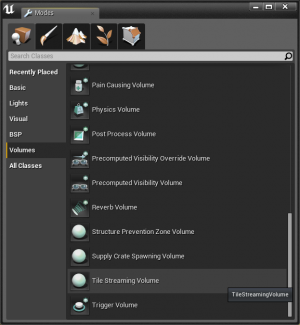
In the Modes window under the Place tab, click the Volumes section and search for a Tile Streaming Volume.
You need to place this volume inside your persistent level, otherwise it will not work.
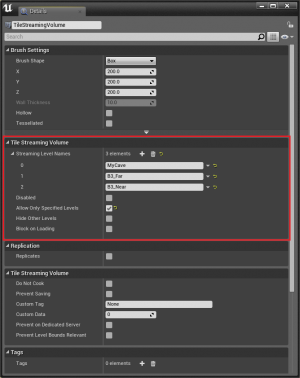
Place the volume down and size it to cover your cave, you may need to use multiple volumes, or custom shape the volume to do so. Now we are going to change the settings of the volume to only load specific levels. Typically for caves you want to load the cave level, the near, and far levels of the area it is located in. But you are free to load however many or few levels you want. Click the volume, and look at the details window. In the Tile Streaming Volume section we need to add which levels we want loaded when we enter the volume. Click the + button to add a new level, and type the name of the level you want to load. Do this for each level you want loaded. In my example I have added the "MyCave", "B3_Far", and "B3_Near" levels.
Now we want to check the box that says Allow Only Specified Levels, this will load in the specified levels when you enter the volume.
You now have a functioning level streamed cave, that will always be unloaded until you enter the volume.


