Terrain Heightmap
Contents
OVERVIEW
The terrain heightmap is used to drive a number of effects in Unreal, such as faked global illumination from the landscape. It can also be used to generate useful textures, like a riverbed mask for flow maps or a depth map for caustics. This page outlines the generation and some common uses of the terrain heightmap.
Generating the Heightmap
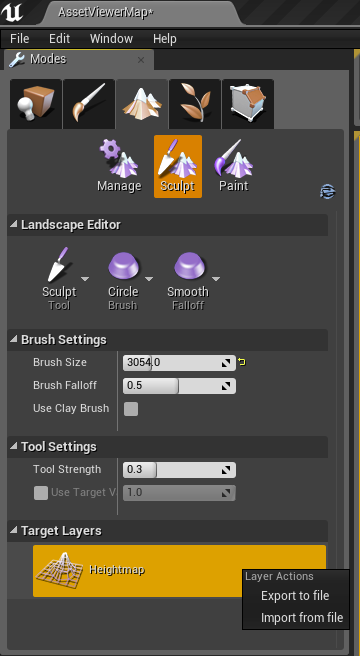
The terrain heightmap should be regenerated whenever major edits to terrain are made. To do so, select the terrain and go into Unreal's Landscape mode by clicking the mountain icon in the Modes toolbar. Select the "Sculpt" submode and look at the "Target Layers" tab. Right click the Heightmap layer and select Export.
You may export the heightmap as either a .png or .raw; a .png is easier to work with.
Editing the Heightmap
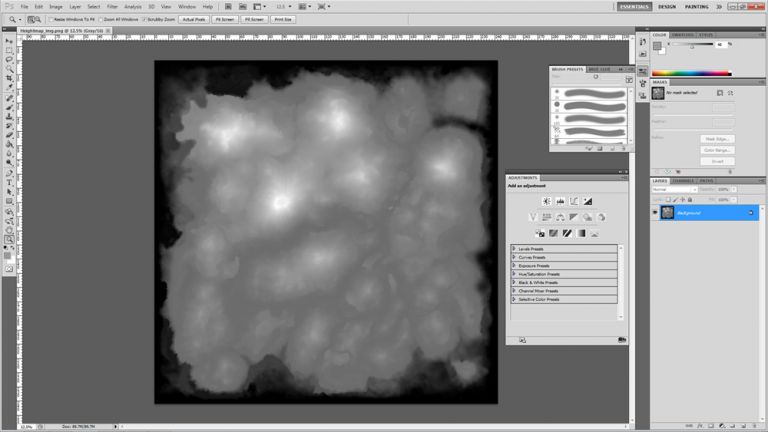
Unreal exports the heightmap as a 16-bit grayscale image. You should leave it as 16-bit when editing and only switch to 8-bit when exporting a texture to minimize artifacting.
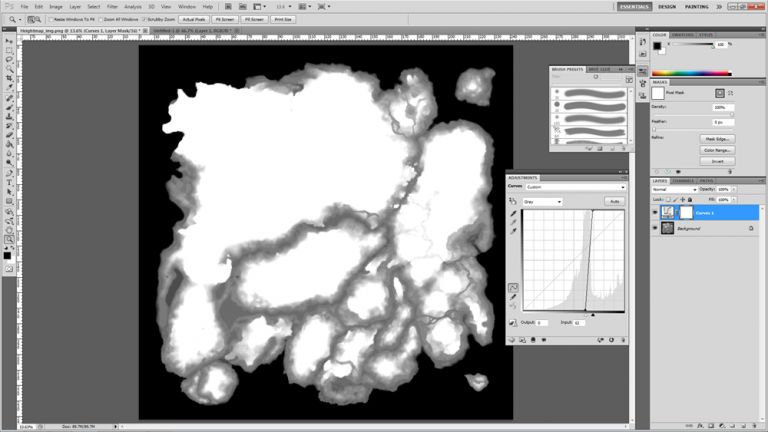
Generally, you'll want to reduce the heightmap to a specific range of values (flowmap masks, for instance, will be most accurate if you rerange the heightmap between sea level and the highest body of water). To do so in Photoshop, use a Curves Adjustment Layer and pull the black- and white-points inward.
You may see banding in gradients after doing a curves adjustment- as long as you're still in 16-bit mode, this is an artifact of how Photoshop presents the image and things should look smooth if you zoom in.
(A rough mask of sea-level rivers)
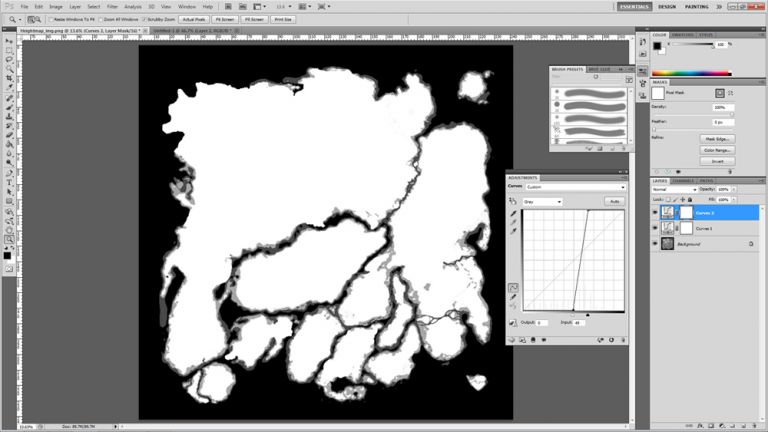
You can stack multiple Curves layers to hone in on a range of values, as below.
(A more accurate river mask. Two Curves layers should be all you need to get a usable map.)
Retaining Accuracy As An 8-bit Texture
The 16-bit map Unreal generates can only express 65,535 units of accuracy, and this is reduced to a mere 256 units of accuracy when converted to 8-bit. We generally want to retain as much accuracy in the heightmap as possible, and there are a few methods for doing so.
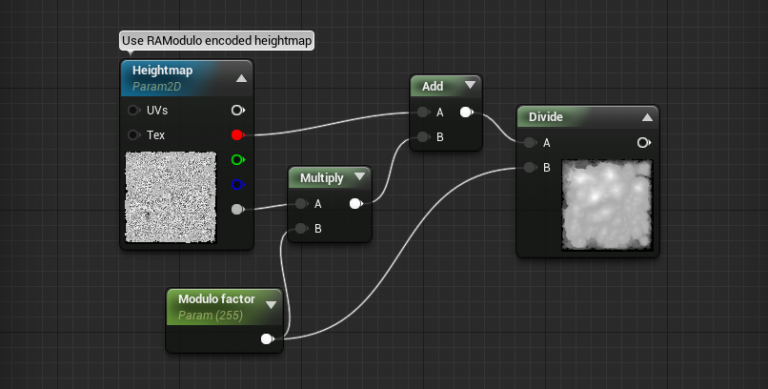
For our purposes, the best method is the "Modulo" method: we divide the 65,535 units of height into 256 chunks (each 256 units in length), storing the chunk index in the alpha channel and the sub-chunk value in a color channel. Decoding this information in Unreal is relatively easy and cheap on shader instructions (see Using the Heightmap in Unreal, below).
The following Filter Forge filter will take a 32-bit .EXR image and compress its red channel losslessly into an 8-bit .tga. You'll need to open the Unreal-generated heightmap in Photoshop, set its mode to 32-bit RGB, and then save it out as .EXR before processing it. Google Drive Link
Depending on how you plan to use the heightmap, you'll need to resize it after processing. For debugging purposes feel free to use a 4k image, but for subtle effects like landscape GI or caustics, a 2K (or even a 1k) will probably be fine.
Using the Heightmap in Unreal
After importing the heightmap, you'll need to change a few texture settings. Uncheck "sRGB" since we don't want to gamma-correct the height values. If you're using it at 4k resolution, set the LOD Group to "Cinematic". If you compressed it as described above, set its compression to "TC Vector Displacementmap", otherwise "TC Greyscale" should be fine (as long you only need one color channel).
If you used Modulo compression, you'll need to do a bit of math to recombine the color and alpha channel into an HDR-range of values:
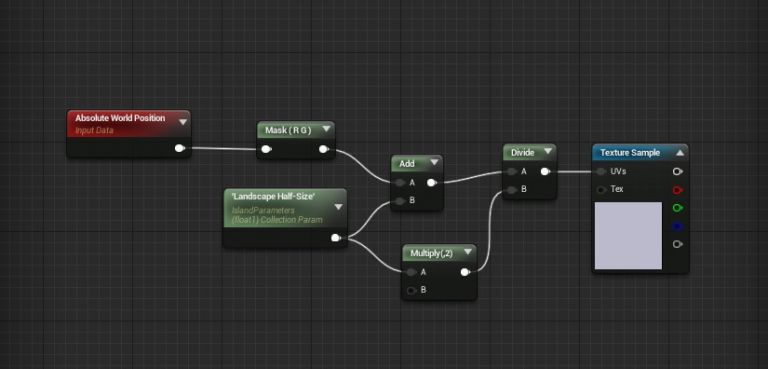
Typically, you will want to use the heightmap (and any similar maps, i.e. a flowmap) as worldspace maps on a per-pixel basis, querying the value of the map at a particular XY world position. To do so, use the following UV setup:
